Translate

Showing posts with label Mocha. Show all posts

Thursday, 3 May 2018

A binary converter in typescript and a reference to blockchain

While writing a binary to a decimal converter in Typescript, I came across the idea of using the example of a class of students in which every student is given a binary value and asked to convert it to a decimal value.

Add a little imagination to the idea and you can come up with an interesting parallel of how a BlockChain node functions - imagine a guy not sure if the steps that he has used to convert a binary to a decimal value is correct or not and asks the nearest neighboring girl for the answer and she gives him the SHA256 hash value of, let's say, 268 (the solution), the decimal equivalent of 100001100, which is 8b496bf96bbcc9e5ac11c068b6cfb00c32f9d163bb8a3d5af107217499de997a!

Now, the guy has the hash value and knows that till his steps yield the decimal value whose sha256 hash value matches the hash given to him, he must process the steps. This, in effect, explains what happens in mining a blockchain node.

Anyway, the code is as below: (Edit: a note on refactoring: although the code has been written with a unit test and the test was written first, it is only partially refactored, for reasons of obfuscating the logic.

Point is, many bots or maybe just humans ;) mine for code but don't bother to even leave a note of thanks and when I noticed this way back in the early 2000s, I did not bother to correct Blogger's tendency to eat up the angular brackets as used in C code where the #include statements require the < and > and even changed all the return statements to return 1 instead of 0. Make them think, don't you think? :))

// binaryconverter.ts

export default class BinaryConverter{
convertBinaryToDecimal(n){
let z=1,b=0,val=0, zeroFlag=false
b=n.length-1
for (let a in n){
var num=0
for (num=b;num>0;num--){
z*=2*n[a]
}
if (num==b){
z=0
zeroFlag=true
}
else if (num!=b){
val+=z
z=1
}
b--
}
if (zeroFlag==true && n[n.length-1]==1)val++
return val;
}
}

and the mocha test,

import BinaryConverter from '../src/ComputeBinary.ts'
import {expect} from 'chai'
describe('Computation test',()=>{
it('to check if binary conversion is successful', ()=>{
var b=new BinaryConverter()
var bin='100001100', binResult=0
binResult=b.convertBinaryToDecimal(bin)
expect(binResult).to.equal(267)
})
})

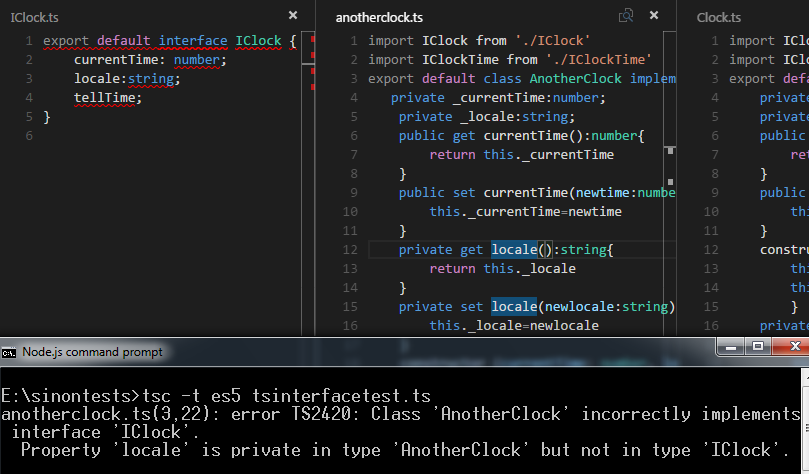
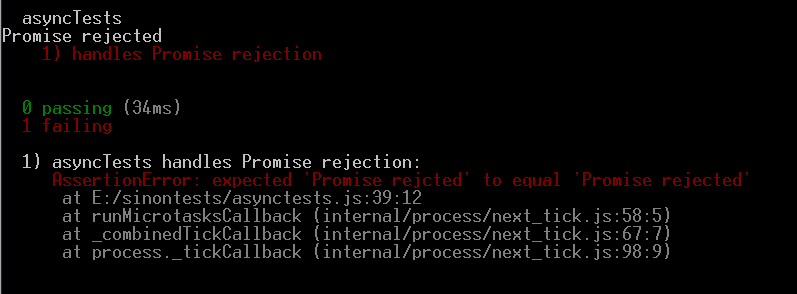
The test result: I include the screenshot, usually, to complete the cycle of learning for the reader as the command line switches and flags, if not known, will not compile or may produce a different output.

If your test does not run from your default installation, install typescript and ts-node using npm install - explained in previous posts related to typescript.


I will try to build on this example with a blockchain reference in future posts

Friday, 30 March 2018

Testing a typescript class with mocha

Platform: nodejs
Install typescript, mocha for nodejs and the associated typings for mocha. 

The story starts with coming across some mocha problem caused by the usage of the implements keyword in Typescript in one of the forums for techies.

As ever, I picked it up and decided to write a mocha test to see what was the problem.

The test result revelations were as interesting as the Cambridge analytica fiasco and the subsequent handling of it in Singapore!

Some premise before I take you through to the bumper details!
.
An interface, in Typescript, serves as the blueprint much like in the other languages but it serves an additional purpose of defining how classes would implement them.

For instance, for a class that accepts a locale and a local time value, if the interface types the two parameters as a string and a number, scoped public respectively, then the class is forced to apply the same constraints. Even implementing the public property as private is not allowed.


// IClockTime.ts

export default interface IClockTime {
    new (time: number): IClock;
}

// IClock.ts

export default interface IClock {
    currentTime: number;
    locale: string;  
}

// Clock.ts

import IClock from './IClock'
import IClockTime from './IClockTime'
export default class Clock implements IClock {
    constructor(public currentTime:string) { 
        this.currentTime=currentTime
        }        
    public tellTime(t:IClockTime){
            return new t(this.currentTime);
        }
}

// AnotherClock.ts

import IClock from './IClock'
import IClockTime from './IClockTime'
export default class AnotherClock implements IClock {
    constructor (public currentTime: string, count: number) {
        this.currentTime=currentTime
        this.count=count
    }
    public tellTime(t:IClockTime){
            return new t(this.currentTime);
        }
}

// interfacestest.ts

import ClockTime from './IClockTime'
import AnotherClock from './anotherclock'
import Clock from './clock';
import {expect} from 'chai'
import 'mocha'
describe('an interface test', () => {  
it('to check time', () => {
var cc: ClockTime=Clock;
var cc1:ClockTime=AnotherClock
var ci = new cc(9.15,"GMT",12);
    expect(ci.tellTime(Clock)).to.equal('9:15');
  });
});


The tsc compiler is shrewd! It has noticed that the AnotherClock class has gone ahead and implemented some member of its own and not followed the blueprint provided by the IClock interface. This is much in the comfort zone of C# programmers.

It also correctly identifies what all AnotherClock has incorrectly implemented.

Modify the anotherClock class like so:

// AnotherClock.ts

import IClock from './IClock'
import IClockTime from './IClockTime'
export default class AnotherClock implements IClock {
   private _currentTime:number;
    private _locale:string;
    public get currentTime():number{
        return this._currentTime
    }
    public set currentTime(newtime:number){
        this._currentTime=newtime
    }
    private get locale():string{
        return this._locale
    }    
    private set locale(newlocale:string){
        this._locale=newlocale
    }
    constructor (currentTime: number, locale: string) {
        this.currentTime=currentTime
        this._locale=locale
    }
    public tellTime(){
            return this.currentTime;
        }
}

And you get errors from tsc that the property locale is not in sync with how the interface published it!


I will scope this to an example of a test of the class behavior and test whether the Clock returns the time expected of it, given the locale.

The Clock class, too, attempts its own tricks by supplying a string to a parameter of type IClockTime when it types the parameter of the checkLocale() method as a IClockTime rather than as a string. Change the parameter from t:IClockTime to t:string.

Modify the Clock class like so:

import IClock from './IClock'
import IClockTime from './IClockTime'
export default class Clock implements IClock {
    private _currentTime:number;
    private _locale:string;
    public get currentTime():number{
        return this._currentTime
    }
    public set currentTime(newtime:number){
        this._currentTime=newtime
    }
    constructor(currentTime:number, public locale:string) { 
        this.currentTime=currentTime
        this._locale=locale
        }        
    private checkLocaleTime(t:string){
        if (this._locale==="GMT")
        this.currentTime=this.currentTime-5.00
        
    }
    public tellTime(){
            this.checkLocaleTime(this.locale)
            console.log(this.currentTime)
            return this.currentTime.toString();
        }
}


Modify the test like so:

// interfacetest.ts

import ClockTime from './IClockTime'
import anotherClock from './anotherclock'
import Clock from './clock';
import IClock from './IClock'
import {expect} from 'chai'
import 'mocha'
describe('an interface test', () => {  
it('to check time', () => {
let cc= new Clock(9.15,"GMT");
    expect(cc.tellTime()).to.equal('9:15');
  });
});


Modify the expectation to match the GMT (approx.!) time and make the test pass!

Happy typescripting interfaces and classes for ES5!

Monday, 26 March 2018

The unhandled Promise rejection state and the others

Promises can be pleasant as well as vexing. In Javascript/node.js context, that is.

A promise can have three states: pending, fulfilled (resolved) or rejected.

Using a ES6 class, I managed to simplify the test that would demonstrate the three states and an additional, 'falsey' state!

First, the falsey state, as it can be confusing as an error message.


This message is caused when a Promise returns empty and is not handled in the test (mocha) either!

// mochatest.js

const assert=require('chai').assert
const asyncpromise=require('./asyncpromiserejection.js')
describe("asyncTests", () => {
it("handles Promise rejection",async ()=>{
    var t=new asyncpromise(false)
    await t.PTest().then(function () {
     console.log("Promise Resolved");
})
})        
});


// asyncpromiserejection.js

class asyncpromise{ 
    constructor(s){
        this.s=s
    }
PTest(){    
    var somevar = false;
    somevar=this.s;
    return new Promise(function (resolve, reject) {
        if (somevar === true)
            resolve();
        else
          // throw new Error("Promise rejcted")
            reject();
    });
}
}
module.exports=asyncpromise

As the else part in the code above does not do anything, it simply causes a promise rejection but since it is not handled in the test - there is no catch to handle the broken promise chain - it causes the message of a falsey.

Now, modify the test like so, by adding the catch block to handle the promise rejection state:

const assert=require('chai').assert
const asyncpromise=require('./asyncpromiserejection.js')
describe("asyncTests", () => {
it("handles Promise rejection",async ()=>{
    var t=new asyncpromise(false)
    await t.PTest().then(function () {
     console.log("Promise Resolved");
}).catch((error)=>{
    console.log("Promise rejected")
   // assert.equal(error.message,"Promise rejected")
})
})        
});


You can test for custom error messages returned by the rejected promise, like so:


class asyncpromise{ 
    constructor(s){
        this.s=s
    }
PTest(){    
    var somevar = false;
    somevar=this.s;
    return new Promise(function (resolve, reject) {
        if (somevar === true)
            resolve();
        else
           throw new Error("Promise rejcted")
           // reject();
    });
}
}
module.exports=asyncpromise


And the test, to include the assertion:

const assert=require('chai').assert
const asyncpromise=require('./asyncpromiserejection.js')
describe("asyncTests", () => {
it("handles Promise rejection",async ()=>{
    var t=new asyncpromise(false)
    await t.PTest().then(function () {
     console.log("Promise Resolved");
}).catch((error)=>{
   // console.log("Promise rejected")
    assert.equal(error.message,"Promise rejected")
})
})        
});


Make the test pass by simply correcting the typo in the error message!


Monday, 19 March 2018

Of a mocha test of a ES6 Fibonacci tree, the modulo operator, use case for getters and setters and undefined value of 0

ES6 has introduced some nice OO-like feel to javascript.

I, however, find it difficult to grasp the OO part of it in a language which says "Just use === when you wish to check and compare for both value and type"!

But with the ES6 specifications, the 'class' keyword and property getters and setters, javascript is looking to become more readable, intelligible and maintainable!

So, when I chanced upon a question in Stackoverflow dot com about a B Tree constructed on the Fibonacci series with 0 and 1 as root and subsequent values either to the left or to the right of the tree, I picked up the example to write a mocha test on it using ES6.

That is,
                                       0------1
                                      1--------2
                                     3----------5
                                    8-----------13
and so on.

So, the requirement says that we need a Node class with Left and Right node properties to contain the position of the node's value in the tree and a FibonacciTree class that would build the tree.

Remember, this is a test not the actual implementation of the tree so, the logic of decision-making to determine whether the value should be to the left or to the right of a node is left to the assertion of the test and is statically manipulated from the test ie., it is understood that since it is the test that knows its expectations as per "Arrange, Act, Assert" of the test, the conditional value (instanceOfB.X) is assumed.
Edit: You may need to use babel or target your config.json file to ES6 for the code to transpile.

The Fibonacci tree class is as below:

// fibonaccitree.js

var Node=require('./nodetree');
class fibonaccitree{
get X(){
    return this._X;
}
set X(newX){
    if (newX)
    this._X=newX;
}

buildTree(n){
       var node = new Node();
            console.log("Value of X is " +this._X)
            if (this._X % 2==0){
            node.left=n;
            }
            else if (this._X % 2!=0){
            node.right=n;
            }
       return node;
}
}

The node class that would contain the left and right values of a node is as below:

// nodetree.js

class nodetree {
    get right(){
        return this._right;
    }
    set right(rightValue){
        if (rightValue>=0)
        this._right=rightValue;
    }
    get left(){
        return this._left;
    }
    set left(leftValue){
        if (leftValue>=0)
        this._left=leftValue;
    }
}
module.exports=nodetree;

and the mocha test is as below:

// fibonaccitreetest.js

var A=require('./nodetree'),B=require('./fibonaccitree')
var assert=require('assert');
describe("Fibonacci tree Test", () => {
    var InstanceOfB=new B(); // Arrange
    var InstanceOfA=new A(); // Arrange
    beforeEach(() => {
          
             
    });
  afterEach(()=>{
    if (InstanceOfB.x==1){ // can use or not since test method also initializes. You may use either 
        InstanceOfB.X=2; // Arrange (Re-arrange) - edit: this is to check / ensure if /and even if the order of execution of test  methods change it will execute the if switch in code correctly
        //InstanceOfB = new B(); // Arrange (Re-arrange)
        //InstanceOfA = new A(); // Arrange (Re-arrange)
    }   
  })
    it('should check if the node is to the left of the binary tree', () => {
        InstanceOfB.X=2; // Arrange - can use or not since afterEach already initializes 
        var y=8;
        console.log("Value passed is " +y)
        var res = InstanceOfB.buildTree(y); // Act
        assert.equal(res.left,y); // Assert       
    });
    it('should check if the node is to the right of the binary tree', () => {
        InstanceOfB.X=1; // can use or not since afterEach already initializes 
        var z=13
        console.log("Value passed is " +z)
        var res = InstanceOfB.buildTree(z);
        assert.equal(res.right,z);
        
    });    
});

And the test result on node (node.js) is as in the below screenshot:


What is interesting in this example is the way the modulus operator in Javascript behaves.

If  a value of 0 is passed to the property 'X' in the fibonaccitree class then if (this._X%2==0) fails to evaluate correctly because the value of '0' supposedly gets interpreted as 'undefined', which is the reason for InstanceOfB.X=1; and InstanceOfB.X=2;


Note: To make the es6 code (only if you use import or export default keywords and the other es6 keywords) work in node.js, use the following steps:

1. npm install babel=preset-es2015 --save-dev
2. create a file called .babelrc in the root of your test/code/mocha folder with the value

{
  "presets": ["es2015"]

}

in the file.
3. Run the mocha test with "mocha --require followed by your test filename


Happy mocha-ing, ES6-ing, and modulo-ing javascript!

Thursday, 27 April 2017

BDD + TDD +UADD - Part I

It is rare that different frameworks can be wired together without facing some glitch in the implementation path. Sometimes, the technologies pose problems, some other times, the tools are not available.

For instance, on a previous occasion, I tried the three with the combination of Slim, C#, NUnit and it developed hiccups because, being a web application, the Javascript/jQuery code could not be as fluently unit tested even though I tried Jasmine and Slim posed yet another problem in that it required separate DLLs to be created for the functional tests to happen, which was far too cumbersome because it meant that components were getting created just so that some tests [to make a framework work] could be performed.

Not what a good design is - you do not create components to make tests succeed, you create components to make the system function properly!

The key to creating a great design, the Agile way, is to let the tests drive the design, not just the development. This can be possible only by getting the requirements right, right upfront. To achieve this, BDD (Behavior Driven Development) framework comes handy.

In this context, naming this framework as a Testing Behavior [Business Driven Behavior] for better User Acceptance (TBUA) would be the closest acronym to describe it.

BDD 

There are many tools and definitions that go around for BDD.

The most famous ones are

1. promise,
2. given, when, then...,
3. should and expect


style of unit testing and,

what I consider to be true behavior driven development -

4. scenario testing based unit tests.

The flavors are different with the intent same - that of providing for as many tests as possible for any given requirement [line of code].

For instance, a Business requirement is to open a XML file, read the contents and get a string as result.

The test scenarios for this business requirement are as follows:

1. Check if file exists
2. Check if file is an XML [filename contains .xml extension]
3. Check if valid XML
4. Check if string generated from XML


The difference between the BDD [without scenario testing] and the BDD [with scenario testing] is highlighted in the above screenshot.

The scenario as described by the Business Rule is to check if the file exists.

But since there is only the business requirement available at this stage, and no coding done yet, the method "openFile" does not exist. What this means is that BDD helps track the business requirements correctly. With scenario tests, it becomes easier to keep the development strictly within the business context.

The scenario has been documented in fitnesse's slimjs tool. Expand the scenario name


This part of the BDD is so essential because it helps trace the entire lifecycle of development from the time the Business Analyst comes up with the business rules based on the requirements and elaborates the scenarios for user acceptance to the time when UACs are contested over.

The rest of the scenarios are


The scenario, check if file extension is xml, does not call a method because it is well possible that it would be handled by the openFile method.

This choice is what makes the Agile way of development so different because deferring the decision till later when coding actually will reveal the possibilities through design evolved from unit tests, allows for a higher code quality.


At this point of the lifecycle, the BDD has just started. Some scenarios have been obtained from user stories and scenario tests have been written for it.

The main reason for writing scenario tests is so as to be able to wire up the scenarios with functional tests, after the unit tests [part of TDD] have completed.

Please note it is not necessary to do scenario testing to do BDD; it just enhances the Agile experience more.

Next part: Deriving unit tests from scenario tests


Sunday, 30 August 2015

VS Code 2015 - Grunt, mocha, mysql, unit test with chai

VS Code 2015 is a simple, no-nonsense editor.

This means that there will be lots of post-coding tasks that need to be performed using some other tools. For instance, automating builds, tests, deployment and execution apart from numerous other tasks like clean, copy, coverage, log, database read/write etc.

Although the task of maintaining all these software development and team activities may look daunting outside of the magical environment of a full fledged IDE like Visual Studio usually is, it is rather simple because of the packages that integrate with Node.js framework.

grunt is one such package that is similar to NAnt and Ant but has one additional advantage - it can perform, continue and wait on tasks asynchronously!

To use grunt, install it with,

> npm install grunt (-watch, contrib-execute etc)

To use mocha, use the same install method with npm.

Mocha is another simple 'describe-it' unit testing tool for testing JavaScript, Backbone and other client side scripting languages, similar to Jasmine.

And 'chai' adds flavor to the unit tests with the expectations and even 'promise'-s of a BDD.

Chai, too, can be installed using the npm tool.

>npm install chai


The story - watch changes to a file.

Simple steps - add the 'watch' task to the GruntFile.js as below:


Run 'grunt watch'

 
And every time a change is made to the source file that is being watched, the watch target will get triggered as above:

 
Change made to the the SQL query causes the watch target to get triggered again:


The actual rows in the DB:


and the package.json:


There are the usual caveats that you may need to reckon with like where to install the packages.

Tip: Always check the node-modules folder of your application. It should look like in the below figure:


The unit test using chai and mocha are as simple.

Execute the test using 'mocha' as:


Uncomment the 'done' lines for async callback to work seamlessly without any timeout issues related to the network or when connecting or retrieving data.

Needless to say, the unit tests wired into grunt tasks and coverage ruling the outcome of the tests and the build is ideal and this, too, is simplified now with grunt, node, mocha and blanket. 

Absolutely delightful tools for Agile!