Friday, 13 March 2020
Thursday, 24 October 2019
Automating BDD - CI/CD, BizDevOps
Simplifying the complexity in the two very important workings of any software development venture is the goal of DevOps. Demystifying the anomalies between this complexity and the business is the need for BizDevOps.
I had tried implementing something similar in a complex environment, when the transformation of the organization was underway and I was leading the implementation of the changes, when I proposed an end-to-end framework that would enable the tracking of a requirement right from the Excel sheet of the Business Analyst through unit tests that would map each requirement in such a way that each item would have a traceability in audits.
So, if an auditor clicked on a deployed item, the entire sequence of unit and functional and other associated tests would be revealed as history,
Since those days of 2008-9, tools have evolved to make that kind of a dream possible but the takers have not been many despite the fact that having every business rule or requirement clearly elaborated through tests into implementation as features is the most sturdy way of ensuring zero waste in the development efforts of the team and a high productivity result for the organization.
That said, as I evolved from .Net to open source to Node.js to the cloud, the power of the testing tools in the market, too, grew and from the simple N/J-Behave, fitnesse-slim tools that could be used to elaborate features and scenarios, respectively, in the system, weird names like Coffee, Cucumber and forks signaled that no longer were techies concerned about the conventional and the success of the open source world even forced the mighty Microsoft world of proprietary software to bundle scripting language into its mammoth Visual Studio dev environment!
This was the sign of things to come and Visual Studio Code kind of reiterated that having your product on the desktop of every developer is more important than just selling - I wonder how it would be if Rolls Royce came up with the poor man's Ghost or Phantom as Visual Studio Code was for many as it brought the years of expertise of the IDE that clearly defined a development environment unlike other IDEs (even Eclipse, the PDE) and brought user-friendliness to the world of developers as they strived to implement the same in their own software products.
I had to elaborate the progression of products that redefined many aspects of software development to attain the level of maturity that the world sees today so that the need for the maturity that saw the drive happening can define the standard of quality of implementation that is expected of all software by any kind of user - poor or rich, educated or uneducated - in the incredibly fast software world of today.
And so, as I felt in 2008, Agile or no Agile movement, every organization, unless the whole world of business went the start-up way, did want to see that the business requirements were as clearly translated to the development stream as test cases were and so, since I had the head start of venturing into BDD then with slim tools like SLIM, I found the new testing tools in mocha, chai, Cucumber and jest just ideal to create a tightly integrated flow between Business (Biz), Development, Testing and Operations - BizDevOps.

Imagine a senior executive typing a sudden idea of a feature while commuting by a metro in Chennai and before they reach office, the feature has been tested, deployed for approval, approved and the development team sitting in Ukraine (because of the closeness of the time zones) have started implementing the feature is under way !
It is not the swag in it that should be appealing but the lack of awareness to not make the best use of it and wait for some kind of a revolution to happen before sane models are adopted as standards which is.
The IT operations were always considered as the river of misery in a software development team, always promising a lot but never delivering due to process and network bandwidth constraints. This huge bottleneck has now been resolved with cloud computing providing the kind of speed and infrastructural freedom that is more a dream than a reality that is widely accepted.
The fact is, if the business executive cannot check-in their (plural used for gender parity) idea and if the technology did not allow for the check-in to be instantly broadcast across the team and if there were no cloud computing available on the mobile then this dream would not be the reality that it is today.
The sheer potential of the available technological advancement is what makes the BiZDevOps an absolute essential framework to go forward with for any organization wishing to achieve Agile standards of software development.
Another great innovation in the software development technology field, aside from the sublime cloud computing, is serverless technology - cloud functions (Lambdas and stuff for the AWS cloud folks and Azure functions for the Microsoft devs) and the incredible freedom to design scalable and seamless architecture at will.
This is what I achieved in 2018 with the help of Google Cloud Functions and the Google Cloud Platform to exploit the FaaS form of architecture that effortlessly converts a few hundred lines of Rest Api code in node.js into a powerhouse of logic.

This, in short, is the crux of the matter, when we design a cloud based architecture! Immense savings in processing power and in maintenance with the freedom to be on top of the competition all the time, with no extra costs in periodic upgrades that a traditional infrastructure would demand aside from the savings in having to invest in the know-how and skilled resources.
Serverless is the keyword in today's world of computing and when you combine it with the demands of an ever changing spectrum of business requirements and communication needs to stay in business, the cloud is the best platform to survive the competition.
A function is the smallest unit of every software system. And when this small unit is made to perform all on its own without the need for a program or an entity to drive it, the quantum of the potential for speed increases in magnitude and scale. This is the scope and power of cloud functions.

The ability to decouple all dependencies in functional requirements to provide a seamless platform of execution - the micro services architecture.
Disparate devices through IoT, sub-systems, disparate platforms, languages or data models work together without the need of a binding force that is the essence of executing a software in an operating system.
It models the modern, digitized world as is - a business interacting in a language that is not the native language of a developer or a tester or an architect but they have to overcome the communication dysfunctions that may arise out of it and develop a solution.
BizDevOps, too, is the representation of the same solution.
And so, extending on the previous post on Automating BDD, I managed to implement a serverless model meant for a distributed team of business analysts, developers, architects, testers and ops.
The architecture is based on a Rest Api deployed as an Api Gateway on the AWS cloud and the logic in the form of a lambda function with the datastore hosted on the Atlas MongoDb on the cloud.
But this is only the design of the software architecture!
There is another architecture that has a say in how the software solution would perform - the technical architecture, meaning the infrastructure bindings! In the modern world of software development, it is almost a given that a software team is not co-located.
This distributed form of a team requires the execution of the development process in such a way as to ensure 24x7 availability of the code under development. This is achieved through what is known as Continuous Integration, Continuous Deployment and Continuous Delivery.
And because my solution is designed on the Amazon Cloud, I found using AWS Code Commit and Code Deploy as the more natural selection for implementing DevOps and since, I had already invested time and effort in creating an automated solution in BDD with Jenkins, Jenkins it had to be for CI/CD and not AWS Code Build!

Stay tuned in for my video demonstrating how the entire architecture is implemented with live check-ins of the features and the subsequent flow of development and the automated testing, integrating and deploying of the new feature here soon!
I had tried implementing something similar in a complex environment, when the transformation of the organization was underway and I was leading the implementation of the changes, when I proposed an end-to-end framework that would enable the tracking of a requirement right from the Excel sheet of the Business Analyst through unit tests that would map each requirement in such a way that each item would have a traceability in audits.
So, if an auditor clicked on a deployed item, the entire sequence of unit and functional and other associated tests would be revealed as history,
Since those days of 2008-9, tools have evolved to make that kind of a dream possible but the takers have not been many despite the fact that having every business rule or requirement clearly elaborated through tests into implementation as features is the most sturdy way of ensuring zero waste in the development efforts of the team and a high productivity result for the organization.
That said, as I evolved from .Net to open source to Node.js to the cloud, the power of the testing tools in the market, too, grew and from the simple N/J-Behave, fitnesse-slim tools that could be used to elaborate features and scenarios, respectively, in the system, weird names like Coffee, Cucumber and forks signaled that no longer were techies concerned about the conventional and the success of the open source world even forced the mighty Microsoft world of proprietary software to bundle scripting language into its mammoth Visual Studio dev environment!
This was the sign of things to come and Visual Studio Code kind of reiterated that having your product on the desktop of every developer is more important than just selling - I wonder how it would be if Rolls Royce came up with the poor man's Ghost or Phantom as Visual Studio Code was for many as it brought the years of expertise of the IDE that clearly defined a development environment unlike other IDEs (even Eclipse, the PDE) and brought user-friendliness to the world of developers as they strived to implement the same in their own software products.
I had to elaborate the progression of products that redefined many aspects of software development to attain the level of maturity that the world sees today so that the need for the maturity that saw the drive happening can define the standard of quality of implementation that is expected of all software by any kind of user - poor or rich, educated or uneducated - in the incredibly fast software world of today.
And so, as I felt in 2008, Agile or no Agile movement, every organization, unless the whole world of business went the start-up way, did want to see that the business requirements were as clearly translated to the development stream as test cases were and so, since I had the head start of venturing into BDD then with slim tools like SLIM, I found the new testing tools in mocha, chai, Cucumber and jest just ideal to create a tightly integrated flow between Business (Biz), Development, Testing and Operations - BizDevOps.

Imagine a senior executive typing a sudden idea of a feature while commuting by a metro in Chennai and before they reach office, the feature has been tested, deployed for approval, approved and the development team sitting in Ukraine (because of the closeness of the time zones) have started implementing the feature is under way !
It is not the swag in it that should be appealing but the lack of awareness to not make the best use of it and wait for some kind of a revolution to happen before sane models are adopted as standards which is.
The IT operations were always considered as the river of misery in a software development team, always promising a lot but never delivering due to process and network bandwidth constraints. This huge bottleneck has now been resolved with cloud computing providing the kind of speed and infrastructural freedom that is more a dream than a reality that is widely accepted.
The fact is, if the business executive cannot check-in their (plural used for gender parity) idea and if the technology did not allow for the check-in to be instantly broadcast across the team and if there were no cloud computing available on the mobile then this dream would not be the reality that it is today.
The sheer potential of the available technological advancement is what makes the BiZDevOps an absolute essential framework to go forward with for any organization wishing to achieve Agile standards of software development.
Another great innovation in the software development technology field, aside from the sublime cloud computing, is serverless technology - cloud functions (Lambdas and stuff for the AWS cloud folks and Azure functions for the Microsoft devs) and the incredible freedom to design scalable and seamless architecture at will.
This is what I achieved in 2018 with the help of Google Cloud Functions and the Google Cloud Platform to exploit the FaaS form of architecture that effortlessly converts a few hundred lines of Rest Api code in node.js into a powerhouse of logic.

This, in short, is the crux of the matter, when we design a cloud based architecture! Immense savings in processing power and in maintenance with the freedom to be on top of the competition all the time, with no extra costs in periodic upgrades that a traditional infrastructure would demand aside from the savings in having to invest in the know-how and skilled resources.
Serverless is the keyword in today's world of computing and when you combine it with the demands of an ever changing spectrum of business requirements and communication needs to stay in business, the cloud is the best platform to survive the competition.
A function is the smallest unit of every software system. And when this small unit is made to perform all on its own without the need for a program or an entity to drive it, the quantum of the potential for speed increases in magnitude and scale. This is the scope and power of cloud functions.
The ability to decouple all dependencies in functional requirements to provide a seamless platform of execution - the micro services architecture.
Disparate devices through IoT, sub-systems, disparate platforms, languages or data models work together without the need of a binding force that is the essence of executing a software in an operating system.
It models the modern, digitized world as is - a business interacting in a language that is not the native language of a developer or a tester or an architect but they have to overcome the communication dysfunctions that may arise out of it and develop a solution.
BizDevOps, too, is the representation of the same solution.
And so, extending on the previous post on Automating BDD, I managed to implement a serverless model meant for a distributed team of business analysts, developers, architects, testers and ops.
The architecture is based on a Rest Api deployed as an Api Gateway on the AWS cloud and the logic in the form of a lambda function with the datastore hosted on the Atlas MongoDb on the cloud.
But this is only the design of the software architecture!
There is another architecture that has a say in how the software solution would perform - the technical architecture, meaning the infrastructure bindings! In the modern world of software development, it is almost a given that a software team is not co-located.
This distributed form of a team requires the execution of the development process in such a way as to ensure 24x7 availability of the code under development. This is achieved through what is known as Continuous Integration, Continuous Deployment and Continuous Delivery.
And because my solution is designed on the Amazon Cloud, I found using AWS Code Commit and Code Deploy as the more natural selection for implementing DevOps and since, I had already invested time and effort in creating an automated solution in BDD with Jenkins, Jenkins it had to be for CI/CD and not AWS Code Build!

Stay tuned in for my video demonstrating how the entire architecture is implemented with live check-ins of the features and the subsequent flow of development and the automated testing, integrating and deploying of the new feature here soon!
Saturday, 18 May 2019
Automating BDD ...
...with Jenkins, typescript, jest, Jest-Cucumber on node.js
Assumption: Jenkins and NodeJs installed in your local machine.
Continuing with a previous post on BDD, this post is on using your GitHub repository as the SCM provider for Jenkins to build the scenario tests written using the Gherkin syntax of given, when, then and executing the tests, written in Typescript, using jest-cucumber on Node.Js!
The scenario is
The above scenario assumes that the features, written in Gherkin syntax, are uploaded to a GitHub repository (This one is named bdd-travis although this is a Jenkins example, because I had used this repository with travis so the name is so!)

and add a new NodeJs installation and your Jenkins page should like in the above screenshot.
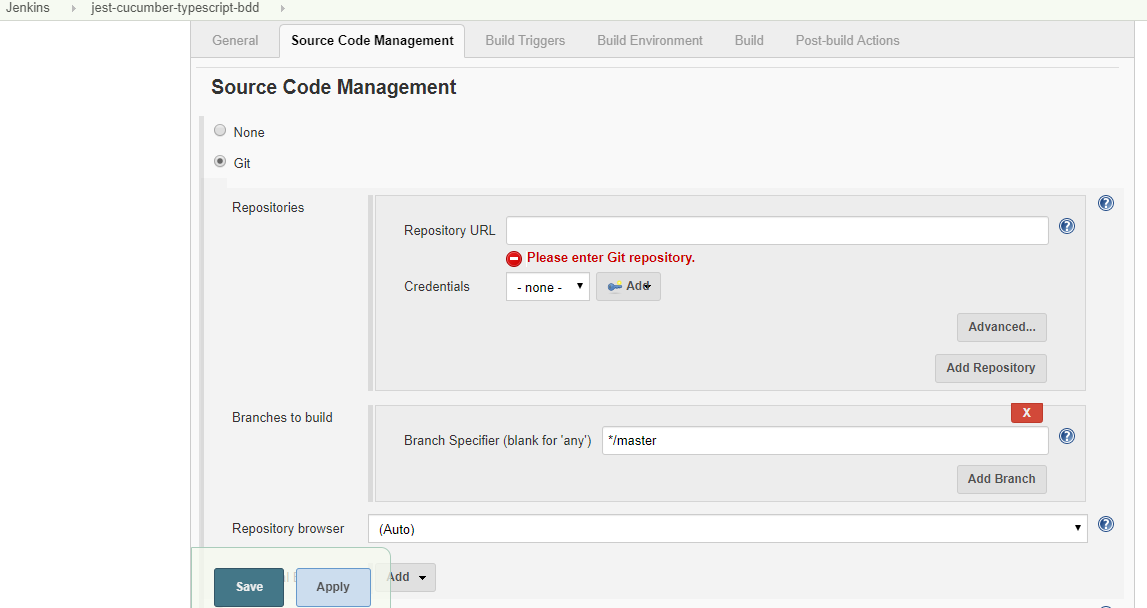
Once the nodejs installation is complete, head to your project and select Configure to configure the GitHub repo details for Jenkins to process the Continuous Integration with the BDD repository.

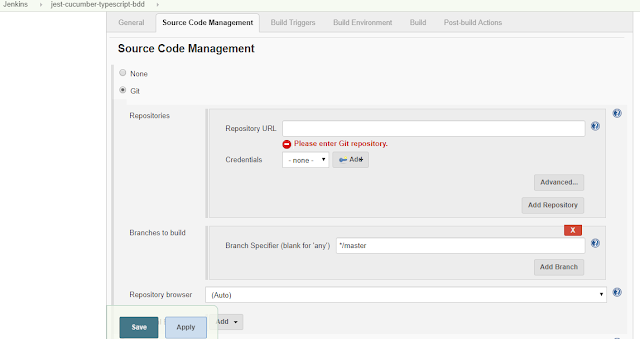
and specify the GitHub repository URL.


Enter your GitHub username and a private key. This private key is the SSH key that you could obtain from any SSH rsa 2 generator like Putty that will give you a public and private key.
Enter any passphrase that you may have created while generating the SSH key.
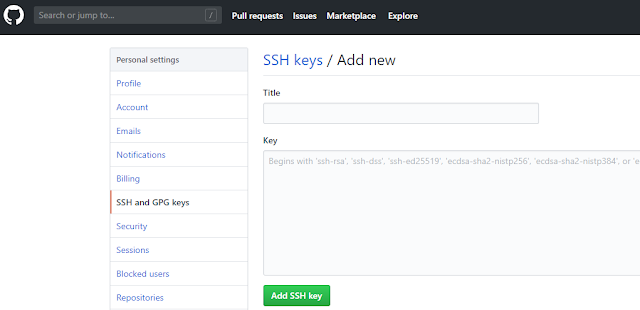
Next step is to add the SSH key in your GitHub repository.
Note: The above steps of adding the SSH key is optional if you are simply using your local machine.
Once everything is set, your Jenkins dashboard show up the files from the GitHub repository in the project workspace.


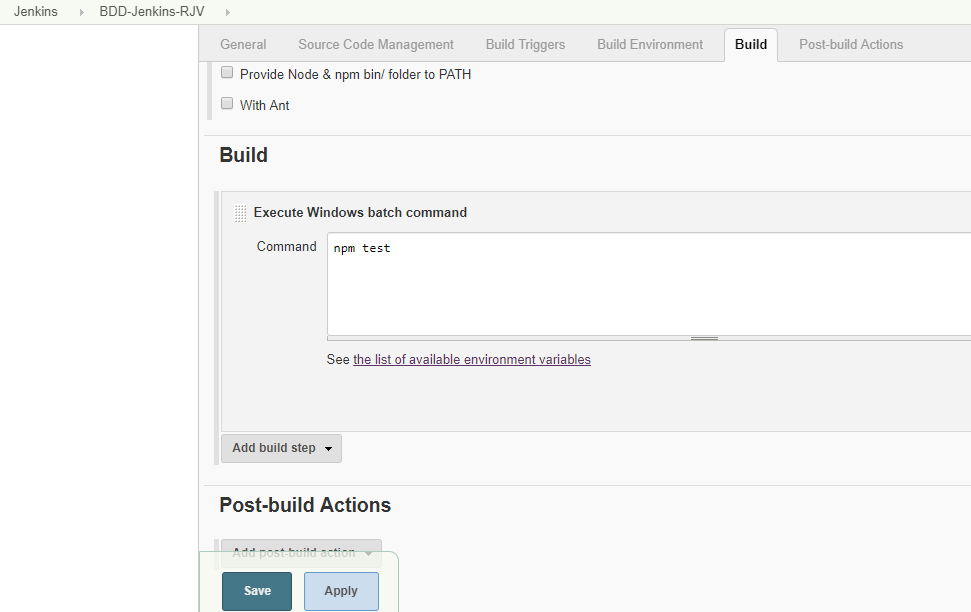
Type "npm test" into the textbox - the same command that you will use on your local NodeJs command prompt to run the Package.json test script and click Save.

Of course, for first time, you may want to run "npm install" to install all nodejs packages required by your GitHub repository.
Remember, the execution of the project will happen in your local machine (or the machine/Docker/Cloud storage where you have installed Jenkins).
Now, browse back to your project in Jenkins and click Build now.


Happy Automating BDD ! 😀😁😃
Assumption: Jenkins and NodeJs installed in your local machine.
Continuing with a previous post on BDD, this post is on using your GitHub repository as the SCM provider for Jenkins to build the scenario tests written using the Gherkin syntax of given, when, then and executing the tests, written in Typescript, using jest-cucumber on Node.Js!
The scenario is
- Your development and the business teams are located distributed across the world and you are managing the entire development process remotely.
- The development team waits for the BDD process to pass the requirements by runniing scenario tests to test the business rules.
- This post elaborates how to setup the BDD environment so that all features envisioned by the business owner are first tested with appropriate acceptance criteria and if the tests pass then the next phase, TDD, begins.
The above scenario assumes that the features, written in Gherkin syntax, are uploaded to a GitHub repository (This one is named bdd-travis although this is a Jenkins example, because I had used this repository with travis so the name is so!)
First step, is to tell Jenkins that you are going to build a NodeJs app.
Configure your Jenkins project to include a NodeJs plugin - Jenkins->Manage Jenkins -> Manage plugins and select the NodeJs plugin.
Once the plug in is installed, navigate to the Manage Jenkins page and click on Global Tools Config
Configure your Jenkins project to include a NodeJs plugin - Jenkins->Manage Jenkins -> Manage plugins and select the NodeJs plugin.
Once the plug in is installed, navigate to the Manage Jenkins page and click on Global Tools Config

and add a new NodeJs installation and your Jenkins page should like in the above screenshot.
Once the nodejs installation is complete, head to your project and select Configure to configure the GitHub repo details for Jenkins to process the Continuous Integration with the BDD repository.

and specify the GitHub repository URL.

Next step is to configure the access for Jenkins. Click on the Add button next to Credentials and select SSH username with password.

Enter any passphrase that you may have created while generating the SSH key.
Next step is to add the SSH key in your GitHub repository.

Note: The above steps of adding the SSH key is optional if you are simply using your local machine.
Once everything is set, your Jenkins dashboard show up the files from the GitHub repository in the project workspace.


Now to build the workspace.

Under the Build tab, select the Execute Windows batch command under Execute NodeJs Script. The check will let you know that there is a NodeJs installation in your Jenkins.

Of course, for first time, you may want to run "npm install" to install all nodejs packages required by your GitHub repository.
Remember, the execution of the project will happen in your local machine (or the machine/Docker/Cloud storage where you have installed Jenkins).
Now, browse back to your project in Jenkins and click Build now.

Once the progress bar completes, click the down arrow next to the build # and click Console output


The Jenkins workspace will now refresh itself with any changes made to the GitHub and so, as and when newer features are tested with scenario tests, Jenkins will run the tests.
So, as a remote product owner or a stakeholder, all you need to do is run the Jenkins build and check out the results and approve the new features.
And a remote development team, waiting to start its TDD process based on the passed (Approved features), would simply pick the baton and sprint towards its goal of delivering a marketable feature frequently and fully tested!
Happy Automating BDD ! 😀😁😃
Wednesday, 15 May 2019
CI/CD - Travis, Jenkins, GitHub, Cloud, DevOps
DevOps is the latest sensation happening in the software development realm not just because of the fascinating array of tools that need to be used to implement a SCM strategy but in the immense challenge that it presents to teams that are on the Agile way of software development.
In frameworks like SAFe, that has a systems view, the importance of DevOps is immense especially when SAFe could encapsulate Behavior Driven Development (BDD), Test Driven Development (TDD), Scrum, XP, Kanban in itself to deliver a solution.
There are many ways of integrating code in a SCM repository but the key factor is in selecting the right tools to have an efficient set of pipelines to enable all aspects of the Agile Software Development Lifecycle.
Traditionally, Continuous Integration(CI) means checking out, checking in, committing code and to ensure that the build always succeeds and the code base is clean for the entire team to use, whenever, wherever and whichever tool they want to access the code from. However, things are not as hunky-dory as it looks because when you check out the tools that are available in the market, including the Cloud based ones, they appear to be free and easy to use so, at first glance, it does look all rosy.
For instance, Jenkins has a cool interface that clearly tells the user on which SCM repo to use.
But the real trick is in enabling the access to the SCM for the tool.
Jenkins is an integrator that works on a different machine from the one where your code is hosted - eg., GitHub and so authenticating the CI tool to access the repository's status, code, scripts important and since Jenkins is a separate server by itself, credentials cannot be passed as is. So, what is required is for a secret that only the two tools know so that they could authenticate against a key generated using a standard cryptographic algorithm like a SSH key.


The difference between the various tools like Jenkins, Travis, Azure DevOps etc is in the way your build configuration is expected to be.
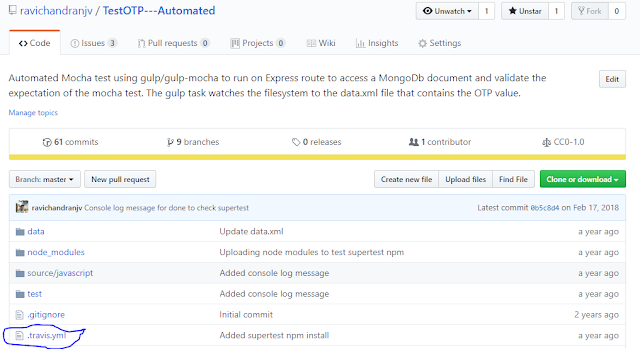
In Travis, for example, the travis.yml contains all the build steps in the form of a yaml script, which means that as long as the virtual machine understands the script, you can just about configure anything, from code coverage to tests to installation of npm packages or not, to running a mongod instance and test results as an Istanbul report, for example.
This configuration script is expected by Travis to be part of your code repository to which it is synchronized with. If there is no travis.yml then Travis will default to Ruby.


And the travis.yml script does many things like installing nodejs packages (which can also be set to ignore with a gitignore file in the repo), connecting to a mongodb instance and importing some json data to running a mocha test and providing a code coverage report.
Jenkins, on the other hand, provides for the build environment, build triggers and build actions and post actions within its interface. And since Jenkins gels well with Maven and the Java environment, its usage requires a good knowledge of the Java development tools, environment like maven, the JDK and the scripts to execute the build.


In frameworks like SAFe, that has a systems view, the importance of DevOps is immense especially when SAFe could encapsulate Behavior Driven Development (BDD), Test Driven Development (TDD), Scrum, XP, Kanban in itself to deliver a solution.
There are many ways of integrating code in a SCM repository but the key factor is in selecting the right tools to have an efficient set of pipelines to enable all aspects of the Agile Software Development Lifecycle.
Traditionally, Continuous Integration(CI) means checking out, checking in, committing code and to ensure that the build always succeeds and the code base is clean for the entire team to use, whenever, wherever and whichever tool they want to access the code from. However, things are not as hunky-dory as it looks because when you check out the tools that are available in the market, including the Cloud based ones, they appear to be free and easy to use so, at first glance, it does look all rosy.
For instance, Jenkins has a cool interface that clearly tells the user on which SCM repo to use.
But the real trick is in enabling the access to the SCM for the tool.
Jenkins is an integrator that works on a different machine from the one where your code is hosted - eg., GitHub and so authenticating the CI tool to access the repository's status, code, scripts important and since Jenkins is a separate server by itself, credentials cannot be passed as is. So, what is required is for a secret that only the two tools know so that they could authenticate against a key generated using a standard cryptographic algorithm like a SSH key.

The same key is with the GitHub repository as part of your configuration of the GitHub account.

The difference between the various tools like Jenkins, Travis, Azure DevOps etc is in the way your build configuration is expected to be.
In Travis, for example, the travis.yml contains all the build steps in the form of a yaml script, which means that as long as the virtual machine understands the script, you can just about configure anything, from code coverage to tests to installation of npm packages or not, to running a mongod instance and test results as an Istanbul report, for example.
This configuration script is expected by Travis to be part of your code repository to which it is synchronized with. If there is no travis.yml then Travis will default to Ruby.
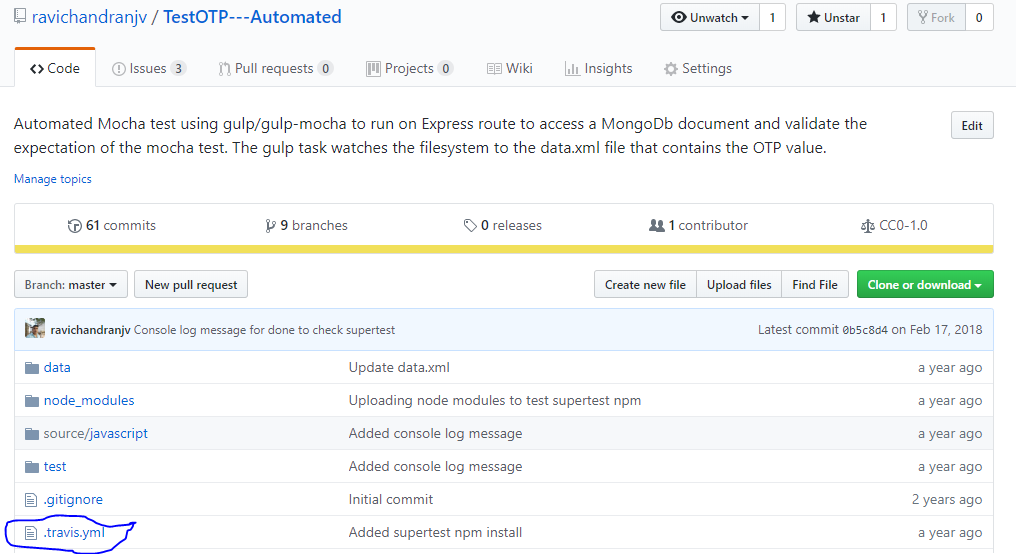
The travis.yml contains the script that tells the Travis CI container how to run the build.


Jenkins, on the other hand, provides for the build environment, build triggers and build actions and post actions within its interface. And since Jenkins gels well with Maven and the Java environment, its usage requires a good knowledge of the Java development tools, environment like maven, the JDK and the scripts to execute the build.


But unlike Travis, which is more suited for open source projects, Jenkins is a more specialized CI tool.
The commonality in all DevOps tools is in the integration of a CI tool with a SCM repository and with a Cloud storage container to enable Continuous Deployment (CD), the usage, though, will differ as per the depth in the software development process of the team.
Below are some important questions that could serve as a checklist when deciding on what kind of a DevOps environment that you want setup for your organization/team?
- Does the team wish to map its BDD or TDD into an automated environment?
- Is there an automated build that is wired with the testing framework and the code coverage tool ?
- Are deployments to the cloud monitored or automated and to what extent is quality ensured in the release to deploy?
- How often is the release to deploy planned?
- What are the planned pipelines in the build that cannot be ignored or skipped and who are the responsible members in the team?
- Does the responsibility or accountability in anyway compromise the agility in the team?
- What are the recovery mechanisms or policies in place for the CI/CD pipelines?
- To what extent does the organization want traceability from requirements to deployment?
Subscribe to:
Posts (Atom)